How to Keep the Back Safe in Yoga Backbends’
By Jeanne Heileman, Published on DoYOUYOGA
Backbends can be some of the most rewarding postures in the repertoire of yoga poses because they bring an opening to the whole body. When done properly, they expand the lung capacity, thereby increasing respiration, which in turn increases our energy and mental positivity. They strengthen the spine and improve our posture, which we all need because of our constant use of cellphones.
The problem for many yogis is that backbends are not practiced accurately, which leads to pain, injury and students opting out of them full of misunderstanding. Here are some helpful things to keep in mind when yoga backbends show up in your next practice.
We Don’t Really Want to Bend the Back At All
It really should not be called a “backbend” for we don’t want to bend the back at all. If we approach them wisely, we should be calling them “back elongations.” When we “bend” backwards, we compress the vertebrae into the discs and this can cause all kinds of pain.
We need to put the focus on maintaining elongation in the spine. As the spine continues to elongate in a pose, it will naturally unfold into the result we are searching for.
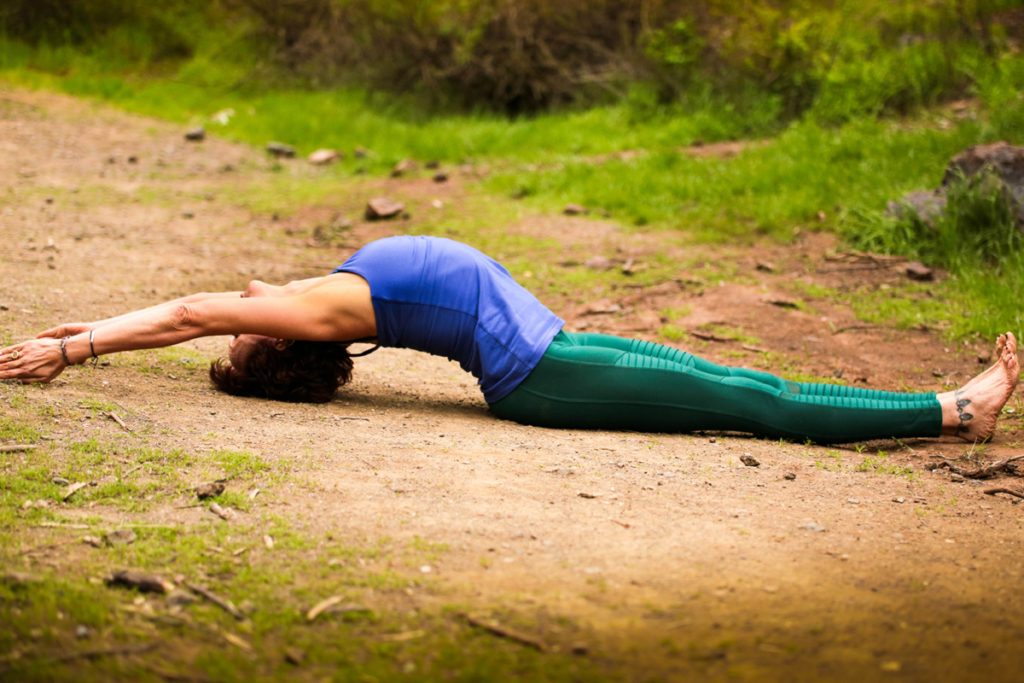
Extend Through Your Legs
Most backbends get stuck in the lower back, the lumbar spine. This part of our spine has a natural backbend curve towards the center of the torso. When we put the center of the backbend in this region, it will compress vertebrae and weaken the spine. By putting more emphasis on elongating through the legs, it takes the pressure out of the lower back.
I tell my students, “The action of the legs is 50% of a backbend.” Extend vigorously through your legs, sending energy away from the lower back and out towards the feet.
Always, Always Elongate the Spine
The majority of backbends should be taking place in the upper back, the thoracic spine, where the curve moves outward from the center of the body. Each vertebra in the spine has a piece that sticks outward, towards the back of our body, known as the Spinous Process.
In the thoracic spine, the spinous process not only sticks out and to the back of the body, but they lean downward. When students simply bend back without elongating the spine, these processes jam into each other. If you have ever felt that you were stuck in your upper back or chest and could not go any further, it is likely that you were jamming in this area.
Before we go into the pose, we need to elongate to move the process away from each other. Then, the pose will move deeper.
Enter on an Inhale
When we inhale, the rib cage rises and spreads outward to allow space for oxygen to fill the lungs. As the rib cage rises, it helps moves the vertebrae further away from each other, elongating the spine. This naturally moves the thoracic spinous processes away from each other, which will allow you to go deeper into the pose. On each inhale, get longer and longer to go deeper.
Open Your Hip Flexors
The hip flexors are one of the gateways to enter a backbend, so we need to practice lunges and similar poses to elongate the psoas and bring the pelvis into a neutral alignment.
Open Your Shoulders
The shoulders are the other gateway to enter a backbend. If the shoulders are tight and pulling the arms towards the chest, it will be difficult to open the upper chest. Choose poses like Gomukhasana arms, Reverse Namaste arms and Dolphin Pose which will provide some expansion and teach the rotation of the arms.
Strengthen Your Back
The smaller backbends on our belly are frustrating and sometimes harder than the bigger ones, because we can’t rely on flexibility. The strength that results from these poses is priceless. Spend some time on strength before you move into deeper poses that require flexibility.
Bring Awareness to Your Feet
How the feet are aligned directly affect the lower back. If they are in a position where the outer, pinkie edge of the foot is leading, it can affect the knees and jam into the lower back. We want a Mountain Pose/Tadasana foot in every pose, with the ball of the foot spread wide, leading a bit more with the big toe than the little.
Tips for Popular Backbends
Bridge Pose/Setu Bandha – Tilt your chin up so that the curve in your neck is not pressing onto the floor. Press the upper arms down into the floor, which will help the shoulder blades stand up into the chest even more. Roll your inner thighs towards the floor. This will prevent you from thrusting your pelvis too high.
There is a tendency to breathe into the belly in this pose and that can add to lower back pain. Try breathing into the upper chest and feel the inhale create space from the inside-out.
Camel Pose/Ustrasana
Camel pose – Lift, don’t go back. Look down at your sternum, and each time you inhale, watch the sternum go up to the ceiling. Try to resist taking your head back until the last possible moment. Press down powerfully with your legs and roll the inner thighs inward and towards your feet.
Students often thrust their pelvis forward and this is guaranteed to compress you into your lower back. Sending powerful energy down through the legs can allow you to put your attention on the lift of the chest. Move the shoulder blades through your body to the ceiling. The head should go back at the very, very end as an extension of the chest lifting.
Bow Pose/Dhanurasana
How to Do Bow Pose 2 – Press the feet enthusiastically into the hands, extending energy through the legs. This takes you out of your lower back. As you do this, pull the hands against the feet. That brings the shoulder blades into the upper chest. Lift the sides of the body when inhaling, lift the arms and collar bones. This gets you out of your lower back.
Direct your breath into the upper chest, extending the length of inhale, to open the upper back and heart region.
Wheel Pose/Urdhva Dhanurasana
5 Key Actions to Take in Upward Bow or Wheel Pose – Keep the legs bent. It will feel that you aren’t working enough, but when the legs “straighten,” it jams the student into the lower back. With the legs bent, one can feel the power of the legs rooting into the floor. The inner thighs should roll towards the floor, which also protects the lower back.
Energetically draw the arms and hands towards the feet while in the pose, as the chest expands past the arms. When you breathe, imagine your spine getting longer and longer. Keep your breath in your upper chest, lifting the collar bones and spreading wide so that the lower back remains safe.
When learning new backbends, it is always best to practice under the eye of a teacher who can help you maintain alignment to have a safe and joyful experience. We don’t have to be afraid of backbends. They have the capacity of opening our hearts as well as our body, and when that happens, everything flows smoother.